Note: This tutorial is now outdated, but I will leave it here for reference anyway.
Introduction
This tutorial describes how to set up a complete toolchain for development with ARM microcontrollers under Ubuntu Linux. The following hardware/software will be used:
- LPC1769 ARM cortex m3 microcontroller
- Eclipse IDE
- Olimex USB-TINY-H programmer/debugger (link)
- Alternatively, the Raisonance jtag cable can be used
- OpenOCD
- arm-none-eabi-gcc (bare, not running any operating system)
- Ubuntu 11.10/12.04 32 or 64-bit
The tutorial is aimed towards beginners who have little or no experience with this subject. At the end the reader should be able to run a basic “Hello World” application written in the C programming language that blinks an LED.
Preparations
Start by installing some dependencies. Open up a terminal and type/paste:
sudo apt-get install flex bison libgmp3-dev libmpfr-dev libncurses5-dev libmpc-dev autoconf texinfo build-essential git
Something may be missing since I haven’t tested this on a fresh install, so if you find something please tell me about it and I will update the tutorial.
Build the tools
The summon-arm-toolchain script (source) will be used to build everything. Download the modified version for this tutorial here. Unpack it somewhere and open a terminal in that directory.
First, make sure that the script is executable by typing
chmod +x summon-arm-toolchain
Now, run the script
./summon-arm-toolchain
Note that you can open the script and set the CPUS variable to something larger than 1 to make it run faster, but for me the build failed by doing this for some reason.
This will take a while. While this is running you can make sure that the tools appear in you PATH the next time you log in. Open another terminal and type
sudo gedit /etc/profile.d/arm_tools.sh
and paste the following in that file
export PATH=/home/your-user/sat/bin:$PATH
replace “your user” with your user name. Save the file and exit. The next time you log in you can run the tools from anywhere without specifying the exact location for the executables. Also, the rest of this tutorial assumes that this is done. IMPORTANT: You have to log out and log back in for this to take effect. Building from Eclipse will not work before you have done so.
Well, the toolchain is probably still building and will continue to do so for a while, so go ahead with the rest of the tutorial.
Make sure you can use the USB-TINY-H without being root
Open a terminal and type
sudo gedit /etc/udev/rules.d/39-mcu-programmers.rules
and make sure that the programmer appears in that file (if you have followed my other tutorials there should be some content in that file). My file looks like the following:
# udev rules file for some usb connected mcu programmers # JTAG ICE mkII ACTION=="add", SUBSYSTEM=="usb", ATTR{idVendor}=="03eb", ATTR{idProduct}=="2103", MODE="0666", GROUP="plugdev" # Atmel AVRISP MkII ACTION=="add", SUBSYSTEM=="usb", ATTR{idVendor}=="03eb", ATTR{idProduct}=="2104", MODE="0666", GROUP="plugdev", SYMLINK+="avrispmkII-%n" # Atmel AVR Dragon ACTION=="add", SUBSYSTEM=="usb", ATTR{idVendor}=="03eb", ATTR{idProduct}=="2107", MODE="0666", GROUP="plugdev" # AVR Doper ACTION=="add", SUBSYSTEM=="usb", ATTR{idVendor}=="16c0", ATTR{idProduct}=="05df", MODE="0666", GROUP="plugdev" # Olimex USB-TINY-H ACTION=="add", SUBSYSTEM=="usb", ATTR{idVendor}=="15ba", ATTR{idProduct}=="002a", MODE="0666", GROUP="plugdev" # Raisonance jtag ACTION=="add", SUBSYSTEM=="usb", ATTR{idVendor}=="138e", ATTR{idProduct}=="9000", MODE="0666", GROUP="plugdev" # Microchip PICkit 2 ACTION=="add", SUBSYSTEM=="usb", ATTR{idVendor}=="04d8", ATTR{idProduct}=="0033", MODE="0666", GROUP="plugdev", SYMLINK+="pickit2-%n" # Xilinx jtag cable ACTION=="add", SUBSYSTEM=="usb", ATTR{idVendor}=="03fd", MODE="0666", GROUP="plugdev" |
Now reload udev:
sudo reload udev
The next time you plug in one of the mentioned programmers you should be able to use it without being root.
Setting up Eclipse
Start by downloading Eclipse Classic from here. Unpack the archive and move it to /opt/ by typing
sudo mv eclipse /opt/
in a terminal from the directory where you have unpacked it. Now create a symbolic link to eclipse by typing
sudo ln -s /opt/eclipse/eclipse /usr/bin
you should be able to start eclipse from the terminal now by typing eclipse. You can also install alacarte (to add eclipse to the unity launcher) by typing
sudo apt-get install alacarte
The next step is to install the GNU ARM plugin. Open eclipse from the terminal by typing eclipse and go to Help > Install new software. Add the following source
http://gnuarmeclipse.sourceforge.net/updates
and follow the steps to install it.
When the script that builds the toolchain is ready and you have logged out and logged back in you are ready to create your first project in eclipse.
Create your first project
If everything did build successfully so far and the eclipse plugin is installed you should be ready to create your first project, which will be able to blink an LED if you follow this tutorial.
Comparison to other microcontrollers
If you previously have set up, for instance, the AVR-GCC toolchain, there are some differences that you should keep in mind. This toolchain only builds code that runs on that architecture and you have to keep track of everything else by yourself. You have to provide header files where all memory locations and interrupt vectors are specified for your specific microcontroller. You also have to write startup code that is executed to set things up before the main loop is entered and a linker script that tells the linker at which memory locations to put the different parts of the program. A set of files using CMSIS is provided with this tutorial. Some scripts to download this to the LPC1769 using OpenOCD are also provided. These files can be re-used later for different projects with the same or a similar microcontroller (such as LPC1768).
Create the project in eclipse
Open eclipse and go to the workbench. Go to Window > Open Perspective > Other… and choose C/C++. Select File > New > C Project. Call the project HelloWorld and choose ARM Linux GCC (Summon) and click next. Uncheck Debug if you don’t plan to use this configuration and click Finish.
Download these files for the example project, unpack them and paste them into your eclipse project. You can either paste the files directly into eclipse by right-clicking on the project and selecting paste or you can paste them into your working directory using the file browser and then right-click on the project in eclipse and choose Refresh.
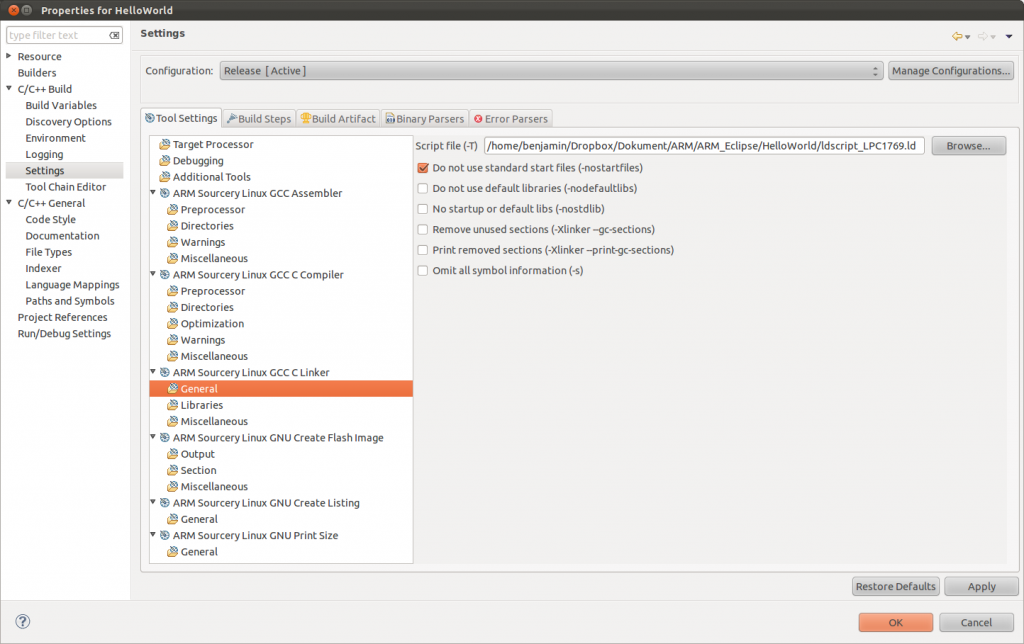
Now that the files are imported, some parameters for the project have to be set. Right-click on the project and choose Properties. Choose C/C++ Build > Settings, select Target Processor and choose cortex-m3. Select General below the linker settings and set the Script file (-T) to ldscript_LPC1769.ld which you downloaded together with the other files for the project. It should look something like this:
Click apply to use the new settings.
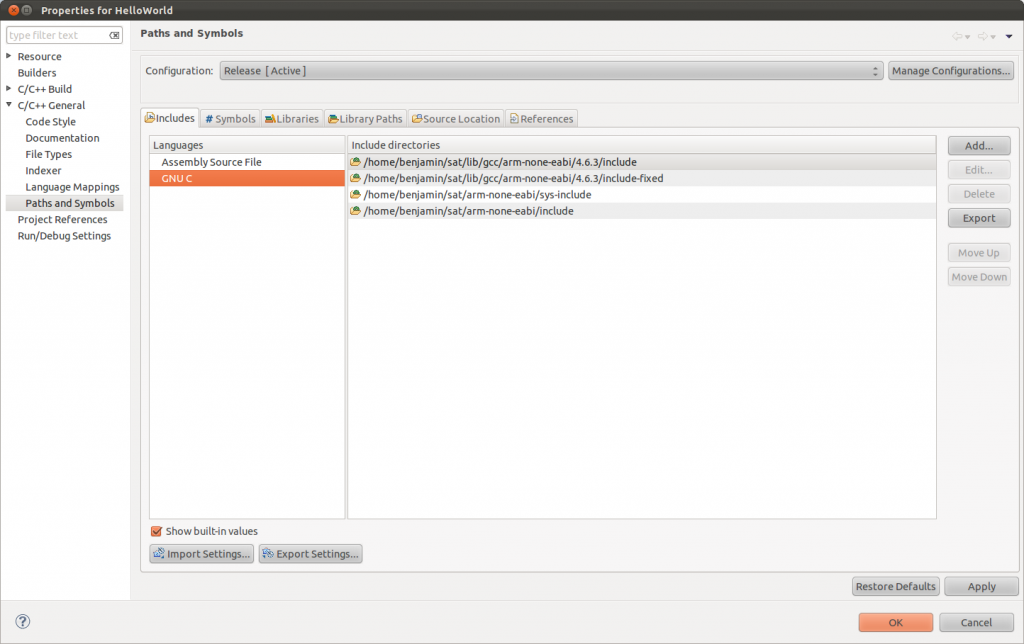
In order to make auto completion working for functions in standard libraries, such as sprintf, you have to show eclipse where the header files are located. On the leftmost panel in the properties, choose C/C++ General > Paths and symbols and select GNU C in the Languages panel and make sure it looks something like this:
If the include directories are missing you should add them manually. Click Apply and then OK. You should be able to build the program by now using the Build button on the upper toolbar.
The program can be uploaded to the microcontroller by executing the ProgramHex script. Note that you have to edit this script based on the name of your project and the location of the build tools. Also, you have to make sure that the script is executable either by right-clicking on the file from your file browser, go to preferences and ticking the executable flag or from a terminal by typing chmod +x ProgramHex from your project directory. From the beginning, the script looks like this:
#!/bin/bash cp Release/HelloWorld.hex firmware.hex ~/sat/bin/openocd -f olimex-arm-usb-tiny-h.cfg -f lpc1769.cfg rm firmware.hex |
Just replace HelloWorld.hex with the hex-file in the Release directory for your project. If your project is called HelloWorld this should work as it is.
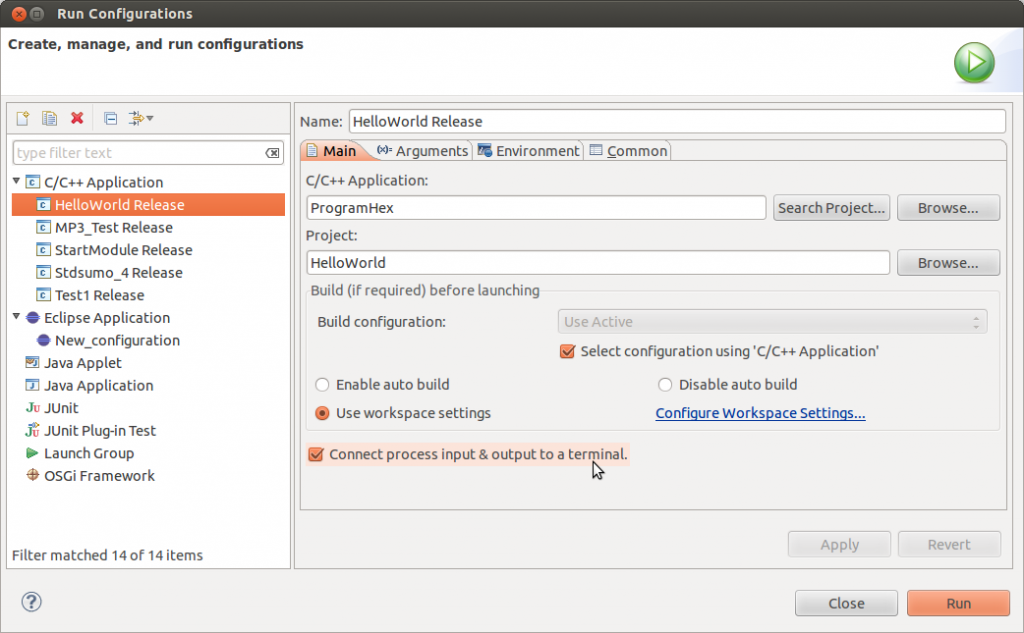
You can also make the run-button (the green button with the white arrow) upload the program by executing the ProgramHex script. To do this, right-click on the project in the Project Explorer and choose Run As > Run Configurations… and create a New launch configuration. Type ProgramHex in the C/C++ Application field and click Apply.
It should look something like this:
If the C/C++ Applications is missing then you are probably missing some plugin. In that case, go to Help > Install New Software. Choose to work with –All Available Sites– and search for Eclipse C/C++ Development Tools and install them. After you restart eclipse go back to run configurations and it should look something like above.
That’s it! If your USB-TINY-H programmer is connected correctly you should be able to upload the program now.
Connecting the hardware
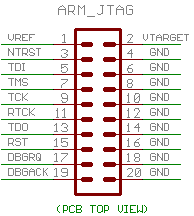
This should be quite straight forward by looking at this picture
I remember that I had some strange problems when I chose the wrong reset pin on that header. I will probe my cable soon and add a table about which pins on that connector are connected to which pins on the LPC1769.
Feedback
I wrote this tutorial based on what I remember from the last time I built the ARM toolchain and haven’t tried to follow it on a fresh install myself yet, so there surely are errors. If you find something, feel free to leave a comment and I will try to fix it.


Nice site and nice article. Regards!
Thank you for the article. I see that in the script file there are versions hard coded, and since I have faced some errors while compiling I wonder if it is possible to change the versions to new ones or it will break something?